
Another week, another update. This week in development has been pretty exhausting, as we are encountering a few difficulties and some tasks became tedious to work with.

Lightmapping is still a big challenge, to be honest. When coming from software like 3ds Max, Beast for Unity offers good results, but behaves a bit like a black box. There are a lot of settings to change, but it takes a lot of time to see the effect of that.
On top of that, Beast seams to crash when baking selected objects for no visible reason. Quite possibly the fault is on our side, but at the moment we cannot reproduce it reliably and file a bug report. We’d really like to contribute to the fixing of this stuff…
But enough of the bad news! On to the gifs and stories.
Mic has been working on the so called “wires”. Wires connect objects and show the relation of those objects. For example a pressure plate is connected with the associated door.This helps player to orient within the game and understand the puzzles. The riddles should be readable and easy to understand. So when creating the art for the levels, we are mostly working within Unity3D, instantiating the already imported assets and placing them. So most of these assets are used multiple times to reduce drawcalls and overall performance. As the riddles tend not to be the same over and over again, wires themselves are similar, but each single wire is unique. Creating them and importing them would take some time and make the process very inflexible.
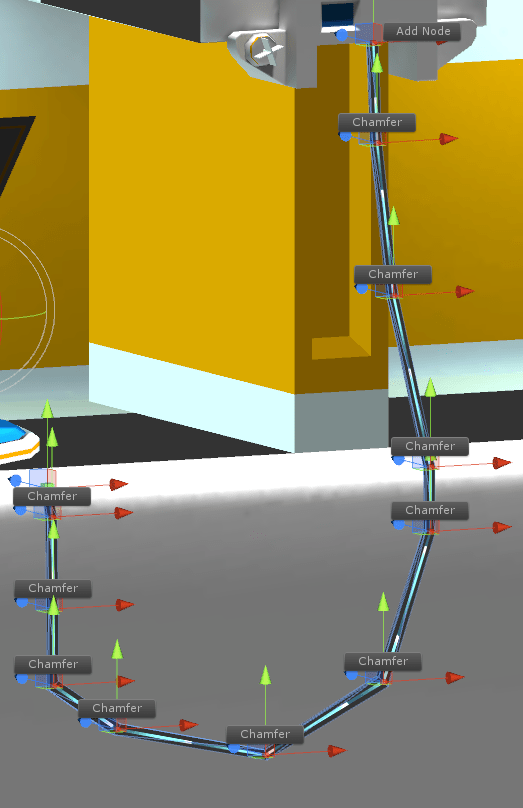
So Mic created a node-based tool in which the end points of those wires can be set and chamfered. A process we know from most 3D software. The wires can now be refined within Unity. Mesh is generated with UVs already applied and so Simons great shader can do its magic on the wires.

Simon has added some shader magic, and boom: it looks cool. More images after the jump.
Mic also worked on the checkpoint system, which is now more suitable for the artists. Scenes can be split up easier than before, which is useful for baking and just improves general handling for the scenes. Aaaand he has been busy fixing bugs. As usual.
Shading and stuff has been one thing, but on the other hand Simon made our coins more appealing. As the characters are part orange juice, part mercury from a laboratory, the coins in the game should resemble orange juice a bit.

As you might have heard, the Shift is our main mechanic and enables both of the players to shift their mass from or respectively to the other player. Nora has been implementing a lot of animations, but this is one that is a bit more difficult. We have to exchange the complete mesh of the two sizes of the two characters. At this point, morph targets seem to be the only solution for this.
Now Nora found a way to have the morph targets shifting the mesh of the character while the Mecanim rig can still play the animations. A super-fluid shift animation ensues. This is in an early stadium, but it looks like it could work out just fine. This may sound strange for the regular reader, but anybody dealing with character animations combined with Mecanim knows what a PITA this can be.

For relaxation, she also made a small ambient animal with animation. Last week we had hawks, this week it’s low poly beavers!
Seeing really nice win/level-complete screens, Rika sat down and created her own interpretation of a such a screen for our game.
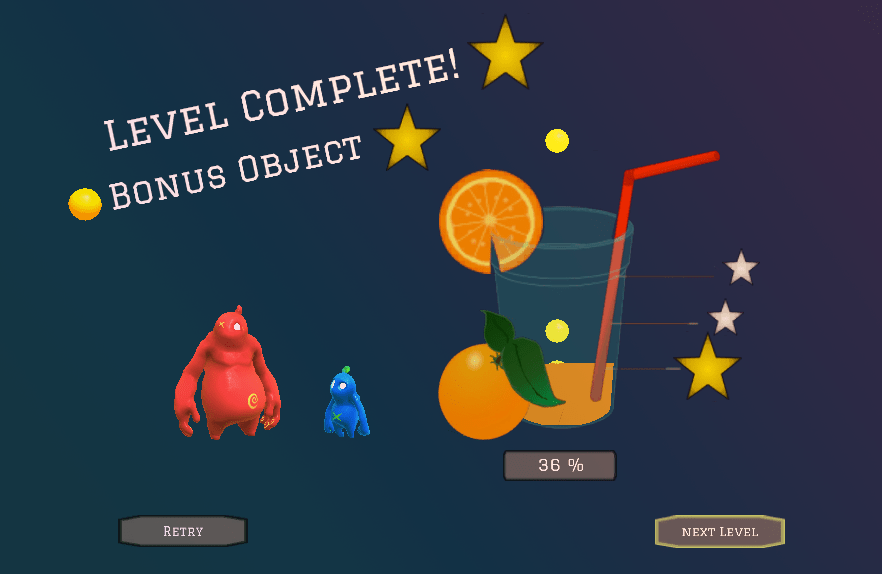
The orange juice gets filled up for every coin you found in the level. Bonus coins get awarded and hopefully dancing ensues.
Rika also fixed some issues with the input menu and added the option to have an axis assigned to a button. The shoulder buttons of most gamepads are axis-based, so this makes controller support even easier.
Well, sometimes the debugging looks strange, and sometimes it looks awesome. And in this case it is pretty awesome. The characters do look at each other. And if there are obstacles, they don’t. Pretty simple. But this is LAZOR™ technology we are using:

We’ve shown a lot of Beffs work recently, but never with some actual graphics. Finally there is something to see. Niko made this tutorial level. which is something like a lab where the functions are explained.
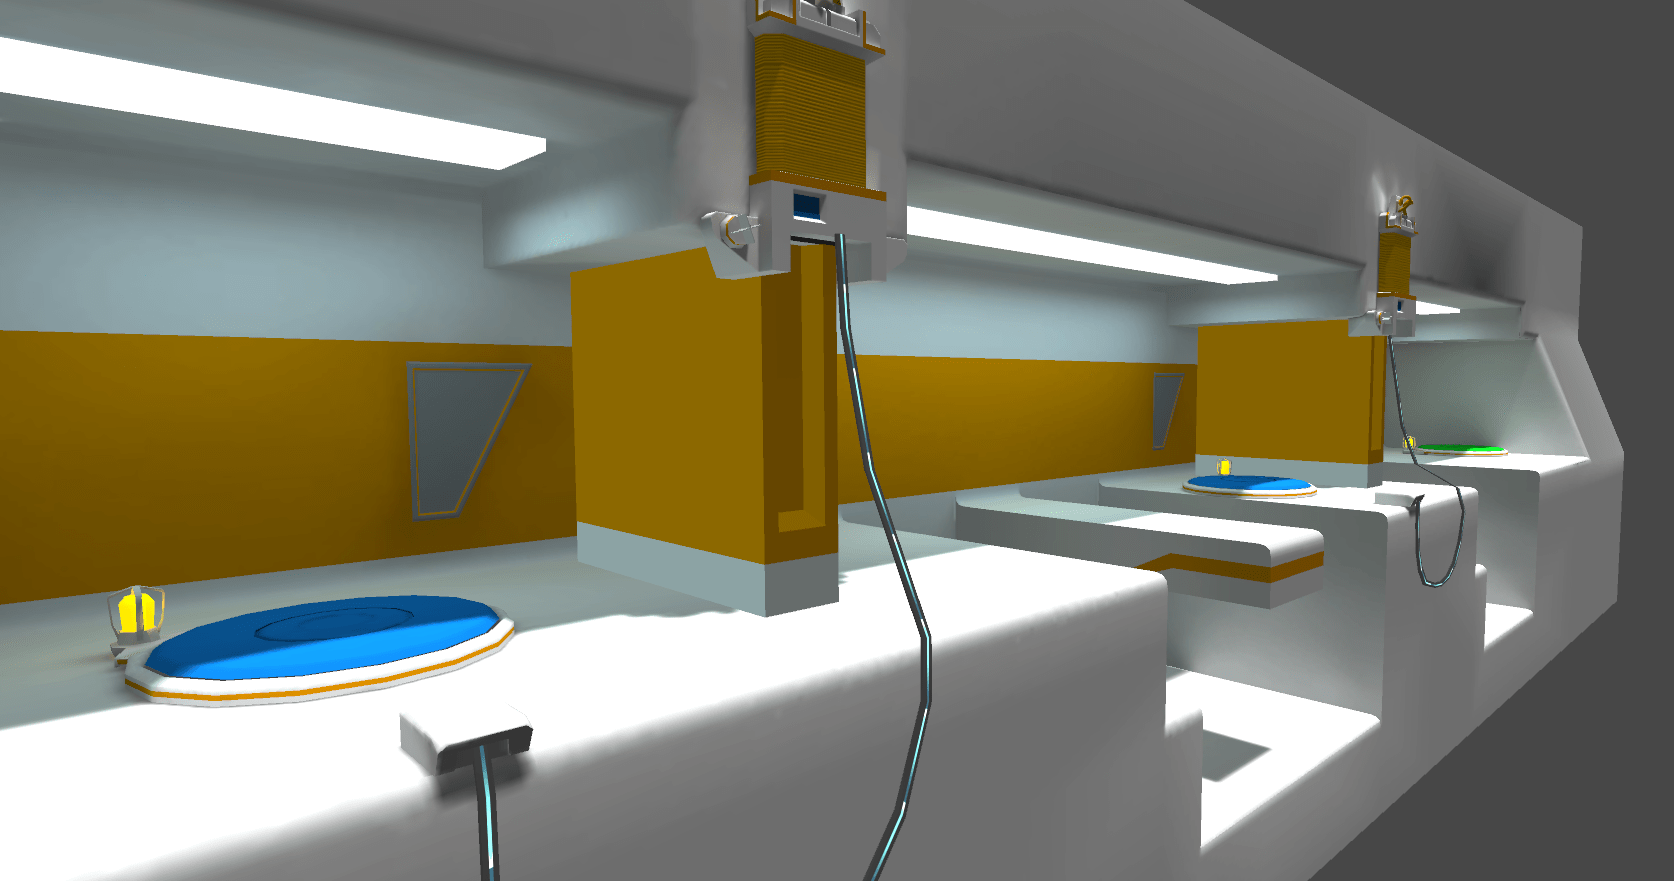
Another cool feature is the indicator for triggering platforms with weight and impulse platforms. The platforms trigger on a specific weight and above that. And to make this visible Niko made an indicator.

The indicator already works pretty good, maybe we are going to add some lighting to it.
One level is complete! All objects have been placed, lightmaps have been calculated and it is playable already. Next week we will be running some playtests and show the game to a bigger audience.
Speaking of lightmapping again, Elena has been working on said level. As we have been asked multiple times on how to achieve this look, she is working on creating a tutorial for the masses. There will be more Screenshots for #ScreenshotSaturday and we’re quite possibly doing a video for the latest progress.
The playtests take some preparation, thus Beff has been busy retesting all tutorial levels, changing level order and tweaking the learning curve. We’re pretty excited, as more than 20 people will come by during the day and do extensive testing of those levels. He even designed a form to fill out for later evaluation.
What have we been doing the last month? Go have a look for yourself:
And that’s it for the week. Stay tuned on twitter with robin posting as twitter.com/koffeinvampir or like us on facebook.com/klonkgames to receive those updates to your digital front door.

